Cart
0
Improve your soil health and enjoy healthy, thriving plants.
The benefits of no-till
With warm spring weather quickly approaching this planting season, it's a great time to consider a no-till back or front yard garden. While there are benefits to tilling soil when establishing a garden, there are also many consequences. Tilling causes: soil erosion, dehydrates soil, reduces water retention, releases CO2 into the atmosphere, and encourages weed seeds to germinate. And cultivation disrupts the life cycle and stability of myriad beneficial soil microorganisms that can provide water and nutrients to your plants. Exposing these microbes to the sun and dehydration leads to their ultimate demise; simply put, beneficial soil microbes do not like to be disturbed. And destabilising/disabling the soil microbiome curtails all of the benefits that this living soil community provides to plants and the wider ecosystem as well. Moving toward a no-till garden is a great way to protect and enrich the soil while saving time and energy. Here are some tips for starting a no-till garden:
Choosing the location:
Decide what kind of garden you want to build. Will it be a backyard veggie garden or a front-yard pollinator garden? Once you decide what type of garden you'd like to plant, you can start thinking about sunlight and the proper location. Vegetables will require as much sun and freely circulating air as possible. Open spaces are better than locations against walls or board fences where reflected heat can also be a problem. Conversely, your shaded areas can be made beautiful by various perennials such as astilbe and shade tolerant shrubs. Consult your local garden centre experts for plant selection advise for your shaded garden areas.

Eliminate Grass/Weeds:
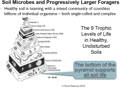
The purpose of a no-till garden is to protect the soil's structure and the microbes that improve the quality and productivity of the soil in the short term, and over time. So how is that done without tilling? You thought that tilling was a good thing - right? The deep dive that science has done into undisturbed natural soil ecology and function has shown just how bad (how counter-productive) tilling soil actually is. No-till methods rely on diverse communities of soil microbes and tiny soil critters to prepare and maintain the soil in our garden beds. (See the chart at the bottom of this Blog to see just how many creatures thrive in health undisturbed soils)
Once you've picked out the location of your garden, you’ll need to assist nature in preparing your garden soil. Gather some cardboard or old newspapers to smother the grass and weeds in your future garden bed. Cardboard works best, it won't blow around if you’re working on a windy day and will slowly break down completely once the soil, manure, and/or mulch are added on top.
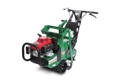
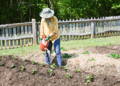
NOTE: if the soil in your location is especially difficult (perhaps highly compacted, heavy with clay, or inundated with tree roots), then you will likely need to take the following measures to get things started. 1) rent a ‘sod cutter’ from your local equipment rental store, like the one pictured here from Stephenson's Rental Services. Use this lawn-mower-size machine to peel-off the top layer of your new garden area – removing the turf and weeds and exposing the “topsoil” below. The material you peel off the surface will be full of weed seeds but is still considered to be ‘Clean Fill’ by most municipalities – find out where they want you to take it. 2) add a generous layer of compost and other organic matter to the surface (3” thick if you can). 3) now rototill that new organic material as deeply as you can into the “soil” you’ve exposed with the sod cutter. Your goal is to end up with a 6-8” thick layer of amended soil. This will be the last time you will need to use the cutter and tiller – not a bad thing - because the motors in these machines produce more CO2 gas from their exhaust than driving your car for several days!
The Top Layer:
Once you have your cardboard or newspaper down, it's then time to add a top layer of organic material. Leaves collected last fall, topsoil from your local garden centre, composted green bin waste from your municipality, well-composted sheep or cattle manure are all great as a top organic layer. If you've considered your soil type and find the area to have low water retention, you can add some mulch as well.

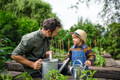
Time to Transplant:
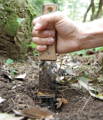
With the new layers of cardboard, mulch, and organic matter in-place, you’ve arrived at planting time. Figure out where in the garden each of your new plants (or starter vegetables) will go. cut an ‘X’ through the cardboard/news paper layer for each plant. The best tool for this is a Hori Hori gardener’s knife, we find all kinds of uses for this tool in and around the garden - we picked up ours from our friends at Plant Paradise Country Gardens. Next, peel back to expose the soil below – dig a hole big enough for the roots of your new plant – firm your plant into the hole and firm down the flaps of cardboard and mulch. If you do this last step right, each plant will end up in a slight depression (or in a shallow furrow) where you cut the ‘X’ – this will direct the water you apply right to where the roots of your plants are growing.
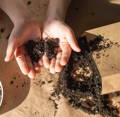
Add Water and Mycorrhizal Fungi :
The final step to complete your no-till garden is to apply water. The first few days of a plant's life in your garden are the most crucial period for establishing the plant's roots, and that's done by ensuring your plants get enough water – and this is also Root Rescue Time. This is what makes Root Rescue so easy – at the end of every planting process you will always apply that critical 1st watering; instead of plain water, simply apply the Root Rescue solution. Watering and mycorrhiza delivery accomplished in one easy step – boom! Learn more about applying Root Rescue in our YouTube video: Root Rescue Transplanter - How, When and Why To Use.
As mentioned earlier, mulch is excellent for retaining moisture, protecting the soil's surface from heating and dehydration, and provides an appealing garden aesthetic. Ensuring your no-till garden gets enough water is essential for breaking down the cardboard/ newspaper layer and layer of organic material. So, establish a regular watering schedule; in most climates, this will be every 3-5 days (if there hasn’t been any productive amount of rainfall during that time).
Creating Robust Roots:
The mycorrhizal fungi in the Root Rescue Transplanter formulation are proven to help plants source more water, especially during extended dry summers, and this helps plants deal with heat stress and other weather extremes. Plants supported by mycorrhizal fungi are more self-reliant, productive, resilient, and disease-free. Transplanter’s mycorrhizal fungi will get to work right away to help your new garden plants. And by adopting no-till techniques, the mycorrhizae will remain vital and productive year after year. Establish a robust symbiotic relationship between the roots of your plants and Transplanter’s mycorrhiza - and you’ll enjoy a thriving garden – and improved soil, and ecological health too!
Live and let live.

Learn More On our youTube Channel
Root Rescue Learning Channel